This article is aimed mainly at website designers considering using Drupal to create a virtual learning environment (VLE). It may also be useful for anyone looking to set up an online course management system.
I was commissioned by a client to redo a course website they had which I had built previously using Drupal. Their main requirement was that it should be as simple as possible for teachers and students to use. This meant enabling teachers with little IT experience to be able to use the site and manage the courses online with as little difficulty as possible.
I started by looking at using opensource virtual learning environments like Moodle to create the new site. After doing a little bit of research however, I soon felt that they were overly complicated to use and went beyond what was needed for the project. It seemed to me that the best approach would be to create the course website using Drupal. Drupal is a powerful content management system that is also very flexible and so can be used to build websites which have very different applications. Drupal would allow me to tailor the website very closely to match their needs and hopefully be able to make the site simple to use.
Besides being simple to use the other main requirements for the website was that there would be:
- Ability to have multiple courses and where students could be on more than one course
- Ability to upload resources for each course that could be listed in a specific order (by date)
- A timetable for each course
- Ability to create news items or updates for each course
- Ability for students to be able to upload work such as essays securely for teachers
- Ability for teachers to comment on students uploaded work and upload documents for the students (e.g. a marked copy of their work)
- Ability for students to create group messages for all the students of the course (a little like a forum)
I decided to use Drupal 7 which is the latest version of Drupal.
Drupal allows the creation of individual content types to suit specific needs. In building the website I started by creating the custom content types I would need. These were:
Courses – used to create all the courses on the website. Theses simply had a title and description field.
Resources – These allowed the uploading of documents for a specific course.
Assignments – These were tasks that could be created by teachers for students connected to a course. They also allowed the uploading of documents for the assignment.
Work – This was where students could upload their work with a description. It could connect to a specific assignment or not as needed.
Timetable – This was a content type to specifically show a course timetable.
News – A content type teachers could use to add news for a specific course.
Messages – A content type students could use to create messages for all the course members.
Drupal has a core functionality for creating updatable websites, but its functionality can be extended by adding on “modules” to suit specific needs. The main modules I used to do the site were:
Views
Organic Groups
Panels
Entity Reference
Rules
Profile2
Comments (part of Drupal core)
As I was using Drupal 7 I didn’t need to use the CCK module as this is now included in the core functionality.
Organic Groups
I used Organic Groups to set up all the courses. I set my Course content type as a group. This then allowed me to add users (students) to the courses. I made all the courses private, so that only course members could access the course and any of its associated content.
All the different content types I had set up (Resources, Assignments, Work, Timetable, News, and Messages) were then set as group content. This meant I could associate each item with a course. It also meant it could only be seen by course members.
Panels and Views
Although I had been using Drupal for about two years building websites I had never used Panels before. Panels allows for quite complex page layouts that can bring in different types of content. It took me a couple of days to get used to using Panels and Organic Groups together. There was a very helpful series of videos on how to use Panels with Organic Groups on the Modules Unraveled website (http://modulesunraveled.com/).
Panels allowed me to put all the information for a course, and related content on the same page. Using Views, which gives the ability to create lists of content, I was able to list the course students and teachers, the latest resources, assignments news and messages all on the same page. This meant students and teachers could see all of the main information they needed in one place.
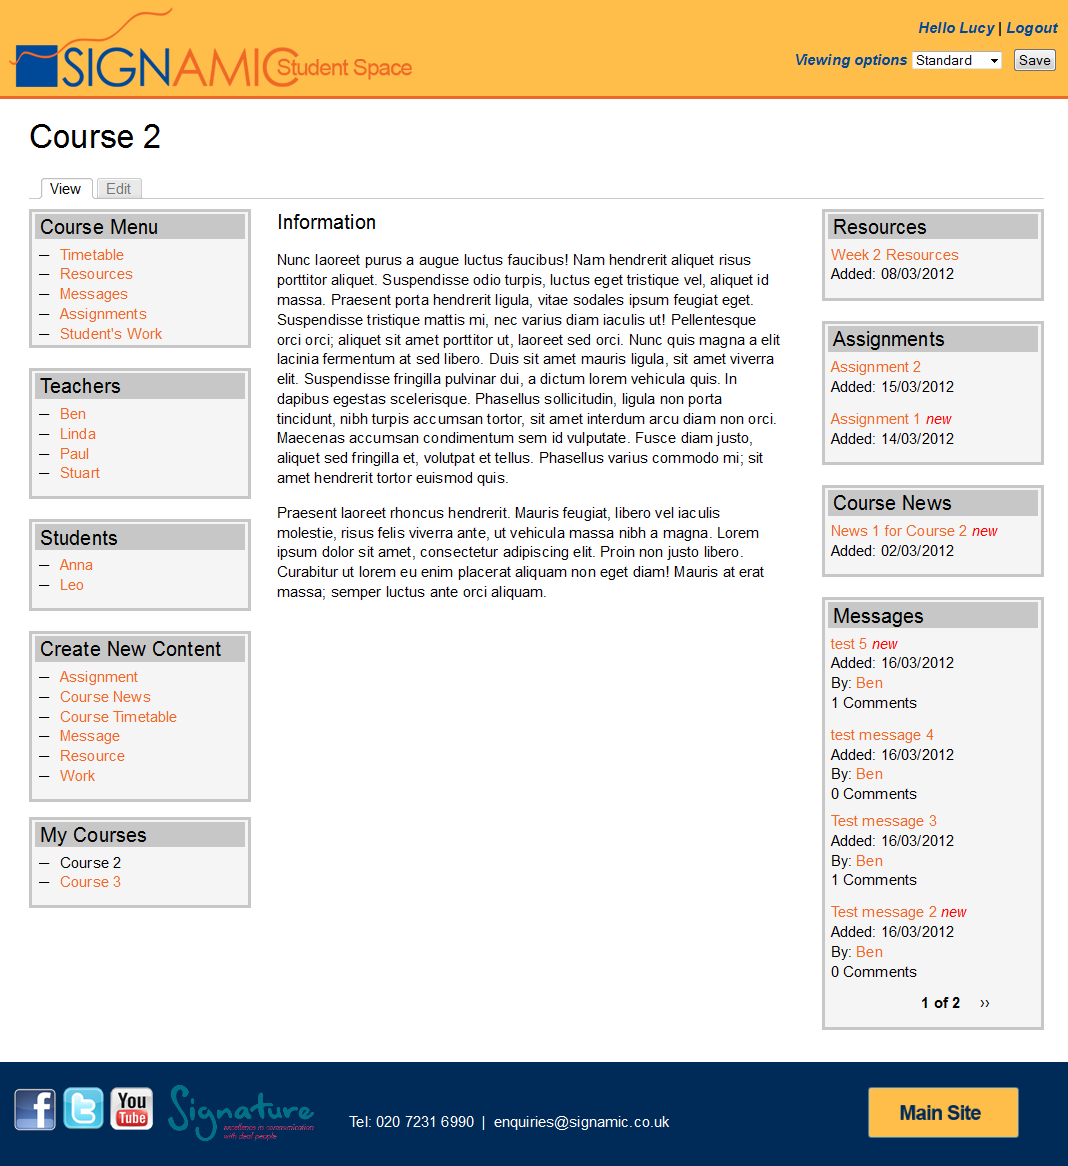
In Panels there is a setting which allows you to override the normal Drupal layout for all page content using a panel layout. This can then be set to only activate in certain contexts. Using this system I was able to ensure all courses had the same layout. Moreover, I could then specify that any course related content such as a timetable or an assignment, would also use the same layout and keep the same related lists of content on the page for the course. So, for example, the latest resources, assignments, news, and messages lists would all stay in place whether you were looking at the course timetable, a resource, or the course homepage.
Entity Reference
Entity Reference sounds a little complex, but basically it gives the ability to relate one piece of content to another. I used the Entity Reference module to allow the connection of a piece of work to an assignment. So, a student, when uploading their work, could connect it to a specific assignment. This was the only place I needed to use Entity Reference.
The Entity Reference module succeeds the Node Reference module which seems to have stopped being actively developed and maintained.
Rules
Rules allows for automating tasks when specific events on the website take place. I used Rules to create email alerts for course members whenever a new piece of content was added, and also alerts for teachers, when students uploaded a piece of work.
Drupal allows for users to have different roles. People with different roles can have different permissions set as to what they are able to do on the website. For this website I created two main roles: Students and Teachers.
Students were only able to upload work and create and respond to messages. Teachers were able to create new courses, timetables, upload resources, set assignments, add news items, register new students and add students to courses.
Profile2
Profile2 allowed me to add custom fields for students such as their first name, surname, address, telephone, etc. I had thought that the best way of adding fields for users was using the Drupal core user account settings, but it seems that now Profile2 is the preferred method. This was stated in “The Definitive Guide To Drupal 7”.
Comments
The Comments facility comes as part of Drupal core. I used it so that students could reply to messages that had been created. This meant that messages could be used like a forum. I also enabled comments for the Work content type. This meant that teachers could leave comments on students work and even upload documents in the comments.
Resource Library
It was important that teachers would have access to a central resource library where they could create links to files or documents when creating course resources. When teachers created a resource they had the option to either upload a document from their computer or open a library of resources that had already been uploaded to the website. I was able to do this using the IMCE for File Field module. This meant teachers always had access to a central resource library.
Security
Obviously, it was important that only students registered for a particular course could access that course or related content. This was all handled by Organic Groups. Also, it was important that students could only access their own work and not other students’ work, although teachers would be able to access all the work. I achieved this by creating custom visibility rules for the panel panes depending on the member role and the logged in user.
It was also important that all uploaded documents were kept private, so I stored all documents using the Drupal private file access functionality. This meant even if you had a link to a file it could not be accessed unless the user was logged in to the website.
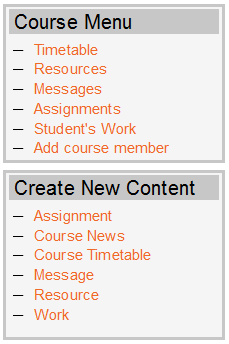
Menus
Possibly the most challenging part of building the site was getting the menus right. For each course there needed to be a course menu which would have to be context sensitive. That is to say there would be links to the timetable, resources, messages, etc., and these would be different depending on which course was being viewed.
Some of the menu items, such as the resources, messages, and others linked to views. For these menu items I was able to adapt to each course by passing in the course id to the view. That way the list of resources would always show those for a particular course.
It was more difficult doing this for the timetable, as this was just a single node (page). I got round this by using the Automatic Node Title module for timetables. This meant I could control exactly what each timetable was called, and this could follow a particular pattern of the course name with “timetable” appended.
So to create the menu item for a course timetable I just needed the path with the course name with “timetable” added on.
I used a custom module to create all the course menu links so I could change the menu item paths when different courses were being viewed and also control who had access to different links.
Features not needed
I did not use the Taxonomy module to help me classify any of the content. I thought this would add complications to the site and I was able to do everything I needed using Organic Groups.
I also did not use a calendar. This might have been helpful if assignments were set on specific dates, or needed to be completed by specific dates, but this was not part of the project requirements.
Layout
For Drupal it is possible to use different themes which give you control over the design of the website. As I wanted to keep everything as simple as possible I used the “Basic Theme”, which gives a very simple layout structure.
I created the website using a “fluid” layout. This meant the content of each page would expand or contract to fit the size of the monitor it was being viewed on. As there was a lot of content on each page, usually using three columns, I wanted to make use of all the space available.
Conclusion
Overall, I am happy with the way the website has turned out. It has met all the project requirements and importantly is very simple to use for both teachers and students.
At the beginning of the project it was very helpful for me to read Michael Widner’s article on how he used Drupal to create a course website for his own students.
- Log in to post comments